
In a previous tutorial I have shown how to enable the sharing service in Ubuntu and change the Workgroup so that it is the same with all the other computers in your network, thus making networking between Ubuntu and Windows 7 easier. In this tutorial I will show how to share folders in Ubuntu and how to access them from Windows 7 computers.
NOTE: Article updated to work on Ubuntu v10.10 & 11.04.
Enable File Sharing & Configure the Workgroup
In order for Ubuntu and Windows 7 to share files, they have to be configured to be part of the same Workgroup. Also, file sharing needs to be enabled in Ubuntu.
To change your Windows 7 workgroup, see: How to Change the Workgroup in Windows 7 & Windows 8.
To configure Ubuntu, see: How to Enable File Sharing & Change the Workgroup in Ubuntu Linux.
Once these items are set up correctly, proceed with this tutorial.
How to Share Folders in Ubuntu
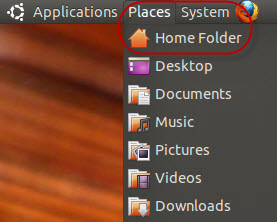
First, open the Home Folder in Ubuntu, found in the Places menu.
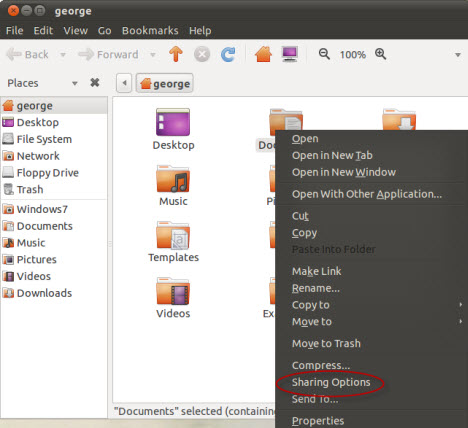
Browse to the folder you want to share. Right-click on it to open the contextual menu and click on Sharing Options.
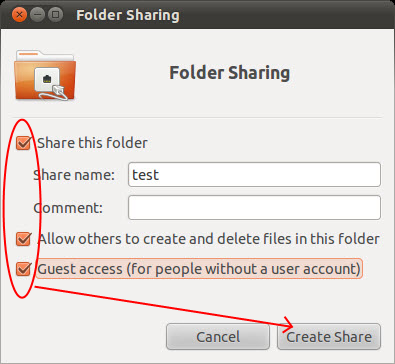
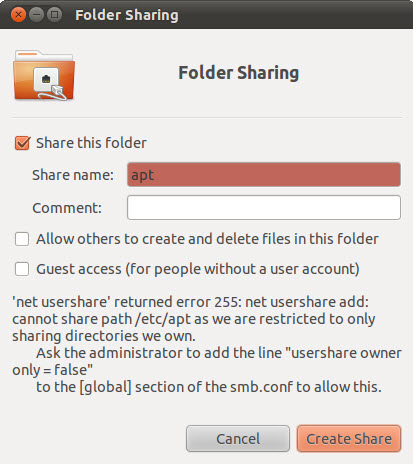
The Folder Sharing window will open. Check the box next to 'Share this folder'. Then, in the Share name field, type the share name you want to use. In the Comment field type anything you want or just leave it empty - there's no need to complete it. If you want to allow others to create and delete files in the folder you are sharing, check the box next to 'Allow others to create and delete files in this folder'. Also, if you want to allow Guest access, check the box next to 'Guest access (for people without a user account)'. When done, click on Create Share to actually share the folder.
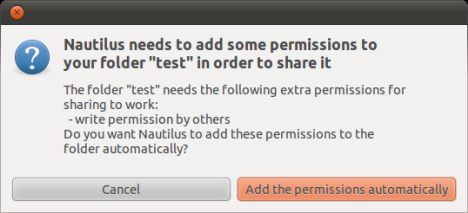
If you have selected the option 'Allow others to create and delete files in this folder' a pop-up shows up, asking if you want to add some permissions to the folder you are sharing. Click on the 'Add the permissions automatically' button. Now, the folder is shared with the rest of the network.
Note: We recommend that you only share folders found or created in the Home Folder because those are folders on which your username has ownership. If you try to share a folder outside the Home Folder, you will receive the following error message: "net usershare returned error 255: net usershare add: cannot share path as we are restricted to only sharing directories we own." This error appears because you don't have ownership on those folders. In order to share any of them you have to go through a complicated procedure that has the potential to add security risks to your Ubuntu computer.
Access Ubuntu Shared Folders from Windows 7
After you shared a folder in Ubuntu, let's see how to access that folder from a Windows 7 computer.
Open Windows Explorer. Click on Network to view a list with all computers available (turned on at that time) in the network.
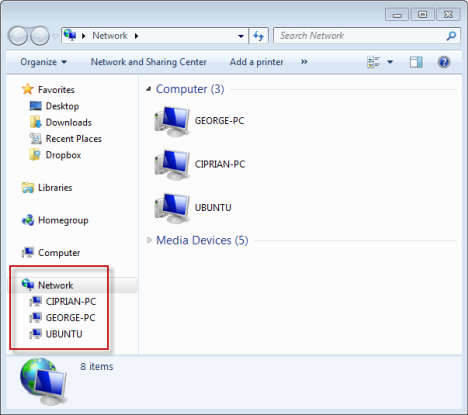
Double click the Ubuntu computer you want to access. A list with all the shared folders and devices from that computer opens.
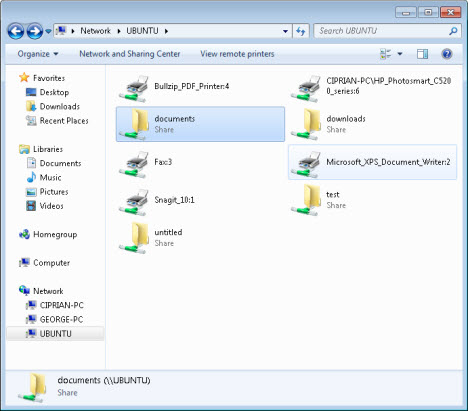
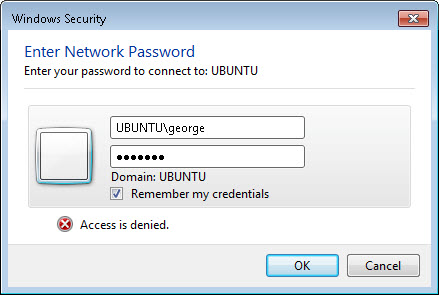
Double click the folder that you want to access. If you haven't setup the shared folder to allow Guest access, you are asked to introduce a username and password.
In the first input field, type the name of the Ubuntu computer followed by a backslash ("") and the name of the user account with access to the shared folder. In the second input field type the password. If you want Windows to remember your username and password, check the box next to 'Remember my credentials'. When done, click on OK.
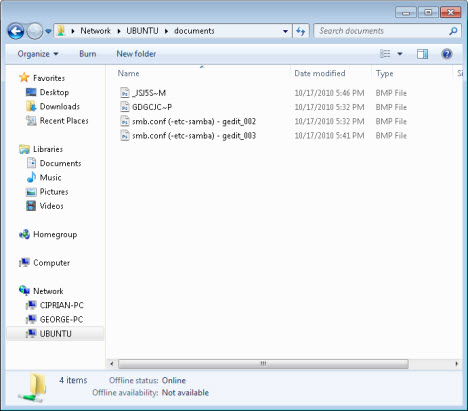
Now the content of the shared folder is shown.
Conclusion
On a network with Windows 7 and Ubuntu computers, you can configure Ubuntu to share files and folders which are easily accessible from a Windows PC. If you want to know more about setting up other PCs on a local network, or how to further utilize the networking features between Ubuntu Linux and Windows 7, check out the articles listed below.