Storing your files in OneDrive is a great way to access your data conveniently. Once your files are in the cloud, you can view or edit them using any device with internet access. But what happens if there is a file you need from your Windows computer, but it isn't stored in your OneDrive folder? You may think you're out of luck, but that is not the case. As long as you've got your Windows computer set to "Let me use OneDrive to fetch any of my files on this PC" and that computer is connected to the internet, you can find any of the files on it and download them right from the OneDrive website. Read this guide to find out how to use this useful feature:
What you need to know about OneDrive's Fetch Files feature
You can use OneDrive's Fetch Files feature to get the files stored on Windows 10, Windows 7, and Windows 8 PCs. However, you cannot fetch files located on Windows 8.1 PCs or Mac computers. If you're using a Windows 10 computer or device and want to enable OneDrive's Fetch Files feature on it, you don't have to install anything as OneDrive is already embedded into the operating system. However, if you want to Fetch Files with OneDrive from a Windows 7 or Windows 8 PC, you need to install and use the OneDrive desktop app, which you can get from OneDrive's website. For guidance on how to download and install the OneDrive desktop app for Windows 7 or Windows 8, follow the steps from the first section of this tutorial: How to use OneDrive for Windows 7.
Note that, for simplicity, in this tutorial, we're using screenshots made on a Windows 10 computer. However, the steps are the same in Windows 7 and Windows 8 too.
How to enable OneDrive's Fetch Files feature in Windows 10
Regardless of the operating system you're using, look at the notification area on the taskbar and right-click or tap and hold the OneDrive icon.

If you don't see OneDrive in the system tray, click or tap on the small arrow on its left to see the hidden icons, and then tap on OneDrive.

On OneDrive's flyout, click or tap on More.
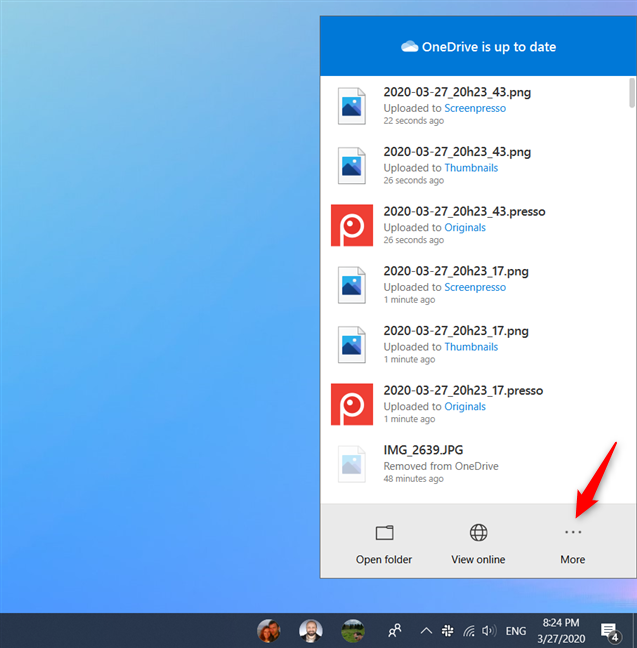
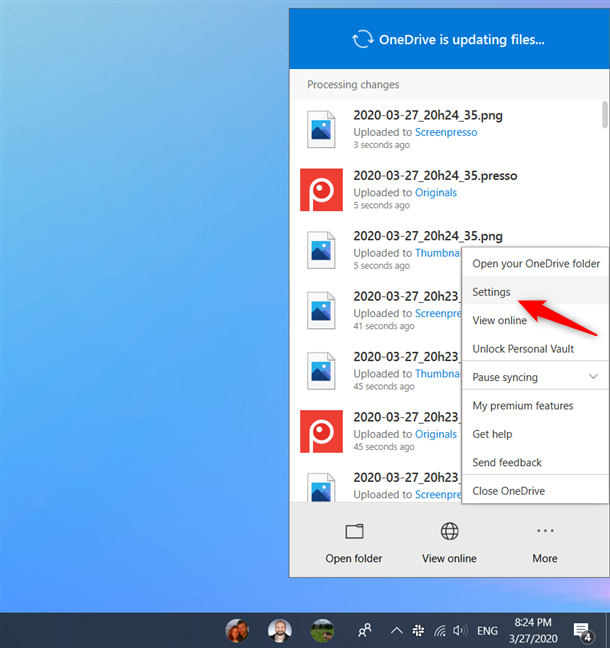
In the contextual menu that shows up, go to Settings.
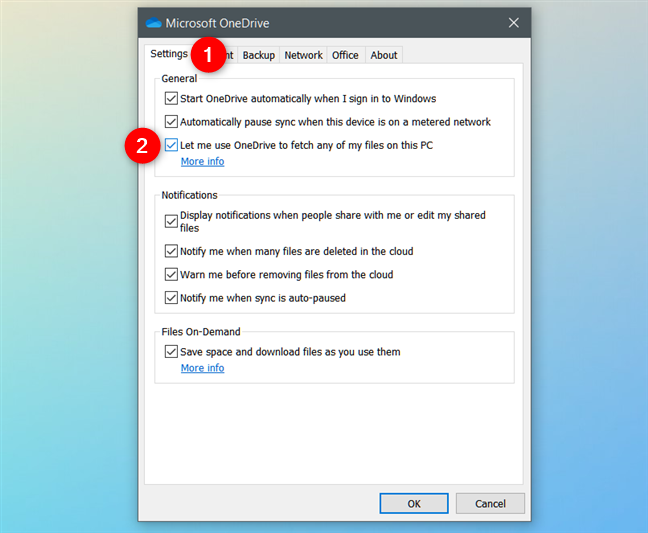
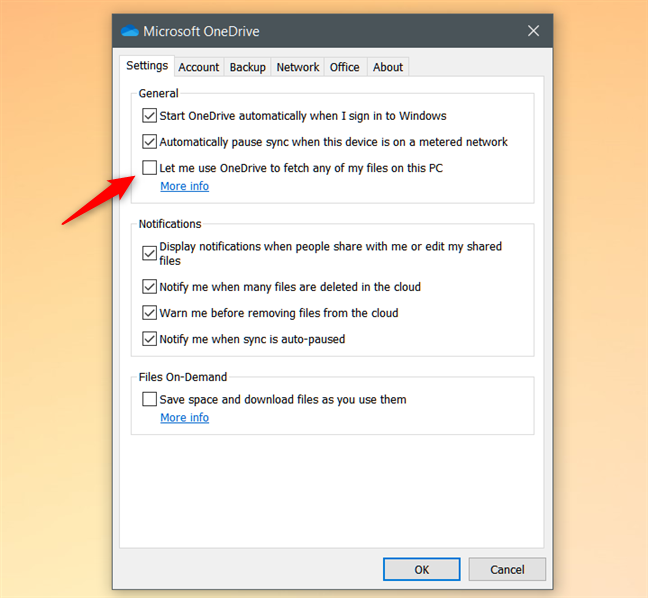
This action opens the Microsoft OneDrive configuration window. To enable Fetch Files in OneDrive, go to the Settings tab and check the setting that says: "Let me use OneDrive to fetch any of my files on this PC." Then, click or tap on OK.
You might be tempted to think that Fetch Files works right now. However, there's one more step you need to do before: restart the OneDrive app on your Windows 10 PC.
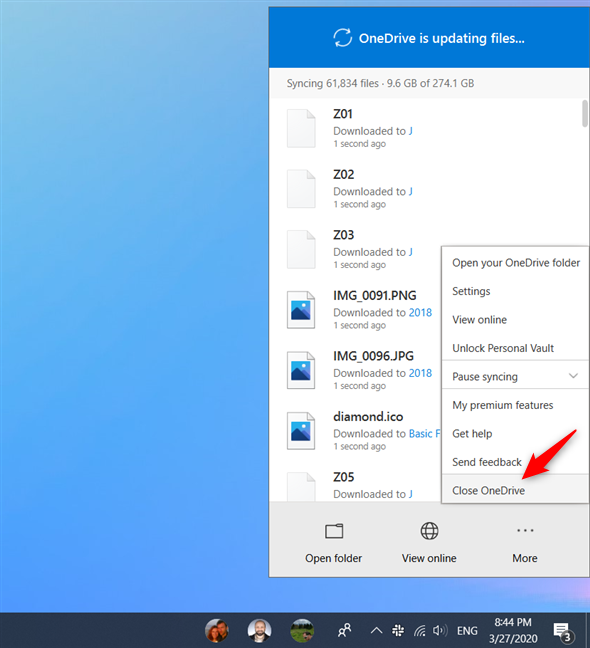
You can do that by either restarting your Windows 10 PC or by choosing to Close OneDrive and then restart it. If you choose the latter, open OneDrive's menu again, like we've shown you before, and click or tap Close OneDrive.
Then, relaunch the OneDrive app, using the search or OneDrive's shortcut from the Start Menu. Now you can Fetch Files with OneDrive from this computer or device.
How to disable OneDrive's Fetch Files feature in Windows 10
If you're wondering how to disable Fetch Files with OneDrive from your Windows 10 PC, the answer is straightforward. Repeat the same steps as in the previous section of this tutorial, but instead of checking the "Let me use OneDrive to fetch any of my files on this PC," uncheck it.
Then, restart your Windows 10 PC, or restart OneDrive to turn off the Fetch Files feature.
How to Fetch Files with OneDrive from a Windows PC
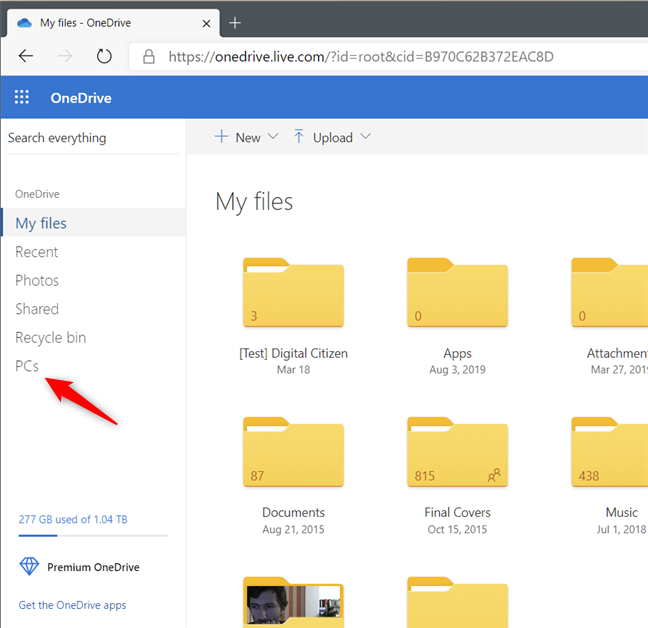
Once you turn Fetch Files on, you can get any files from that Windows computer or device directly from your OneDrive account. On any computer or device, open a web browser and log into your OneDrive, using the same Microsoft account as you do on the PC where Fetch Files is enabled. In your OneDrive, look at the left side of the window and click or tap on PCs.
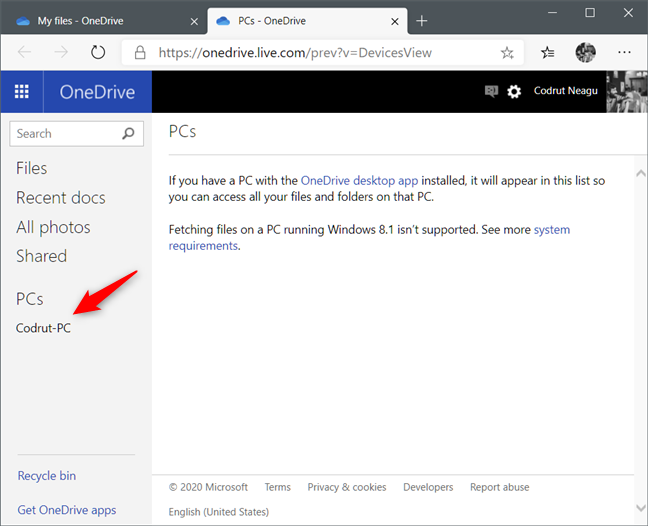
This opens a new browser tab, where you see all the PCs on which you've enabled Fetch Files. Select the computer or device that holds the files you want to access.
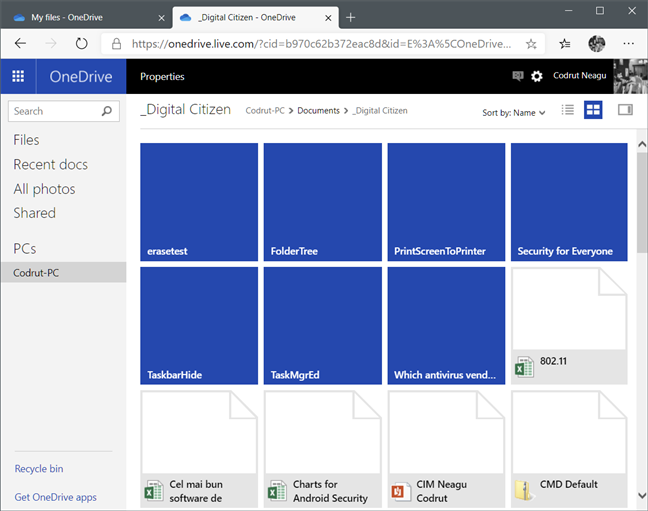
If that PC is on and connected to the internet, OneDrive's Fetch Files lets you see all your drives, libraries, and favorite folders on it.
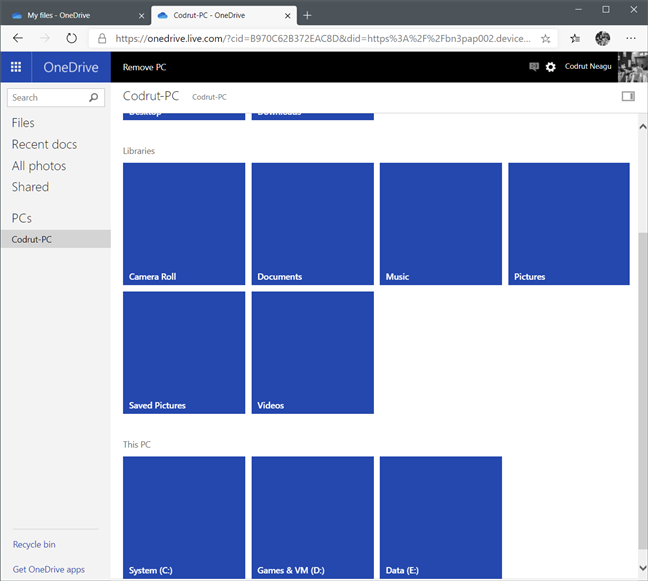
Folders in your file system are depicted by dark blue tiles. Files have different icons based on their filetype. You can go ahead and click or tap on folders to open them and view their contents. You can also use the directory tree listing at the top to go back through the directories you've drilled down into.
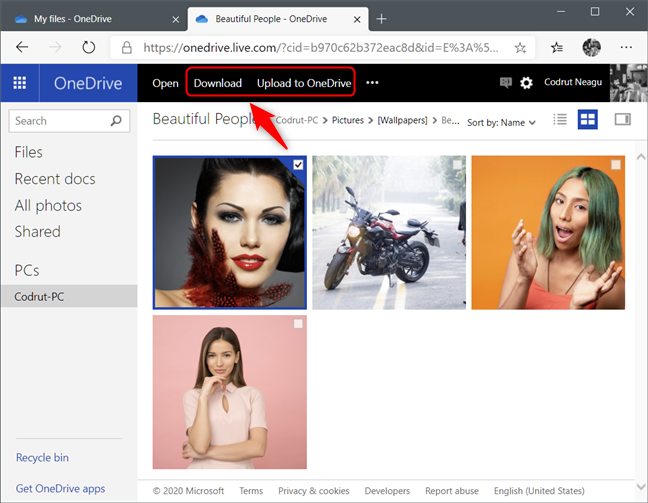
Browse through your remote computer to find the file(s) that you want to fetch. Once you find it (them), select it (them). Then, click or tap on Download or "Upload to OneDrive" link from the top menu.
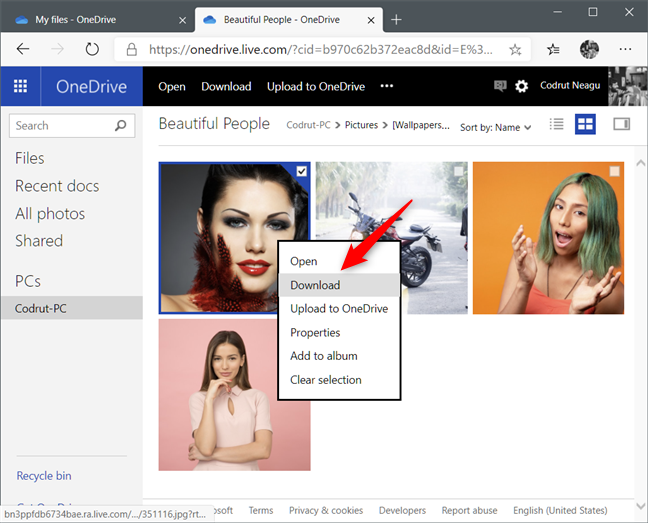
Another way to "Upload to OneDrive" or directly Download a file is to right-click (or press and hold) on it, and then select the appropriate action from the contextual menu.
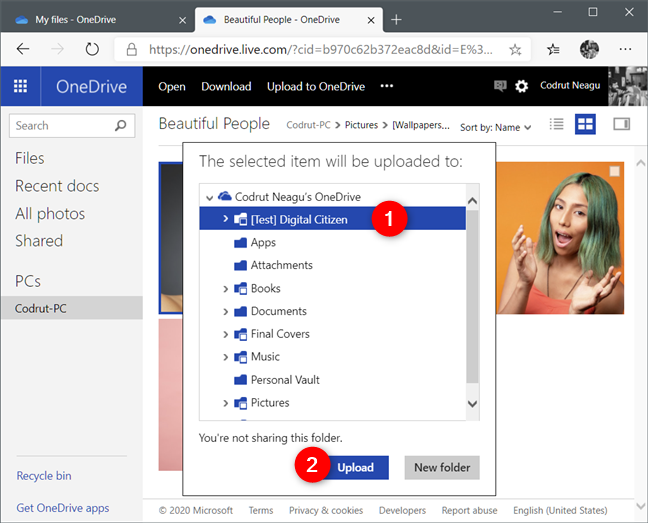
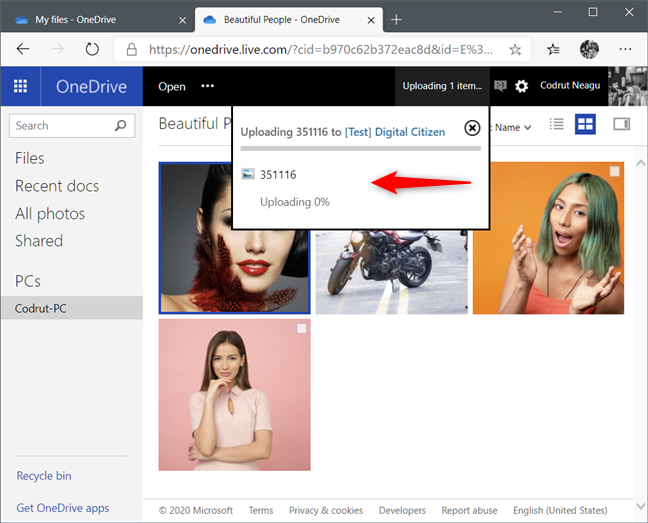
If you chose the "Upload to OneDrive" option, now you can select the folder on your OneDrive where you want the fetched file to be saved. Then, click or tap Upload.
Wait for the file to upload. Once done, it is listed together with the rest of your OneDrive files from that folder. You can now download, edit, or share the file as you would with any other file from your OneDrive.
That's it!
Do you use the OneDrive Fetch Files feature?
Now that you have OneDrive's Fetch Files option configured on your PCs, you can access the files you need, whether or not you remembered to store them in your OneDrive folder. The only requirements are that the computer from which you fetch files must be turned on and connected to the internet. Do you Fetch Files with OneDrive? Do you find it useful? Let us know in the comments section below.