Modern versions of Windows come with a handy disk management utility that allows you to create, resize and delete drive partitions on the fly, without having to boot into a particular disk utility or purchase additional software. The Windows built-in tool we are talking about is called Disk Management, and it is quite easy to use. If you want to make some changes related to your disks and partitions, read on:
NOTE: This article covers Windows 10, Windows 7 and Windows 8.1. Before reading it, you should know that we start from the assumption that you know how to start Disk Management. If you do not know how, read 9 ways to open the Disk Management tool in Windows (all versions).
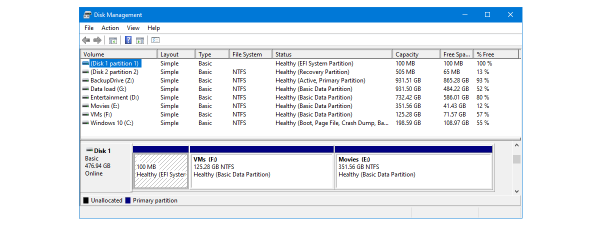
1. See information about your drives and partitions
Open the Disk Management tool and, on its top area, you can see information about your drives. It shows you the name, size, and type of each partition created on the drives found on your system. It displays the partitions that are formatted but also those that are not, as well as any hidden drives or unallocated space found on your drives.
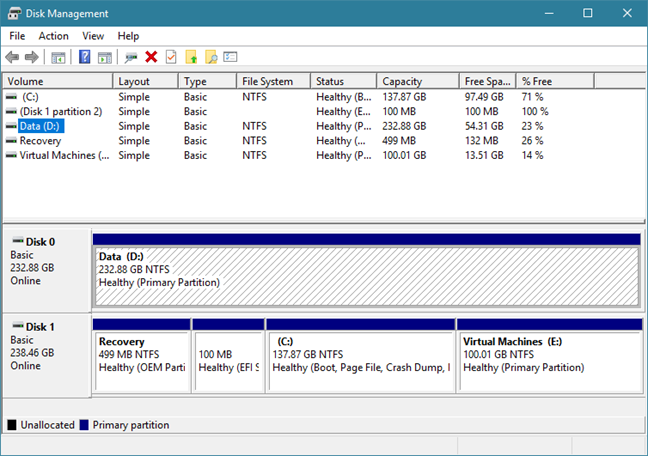
Keep in mind though, that the Disk Management utility can only manage file systems compatible with Windows operating systems, such as NTFS, exFAT, or FAT32. While it can see other types of partitions, such as the ones created and formatted by Linux, it can only delete them, not manage them.
2. Create partitions on your drives
If you have free space on your hard drive, you can use it to create one or more new partitions. The unpartitioned space is highlighted and labeled as Unallocated or "Free space." The fastest and easiest way to create a partition using all or only some of the free space available is to right-click or tap and hold on that unallocated space and click/tap on "New Simple Volume." Then, follow the steps of the "New Simple Volume Wizard."
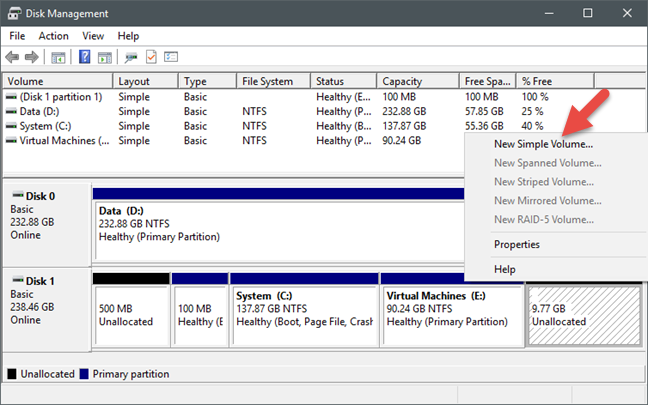
If you need detailed guidance on how to create a partition in Windows, read this tutorial: 2 ways to create a partition, in Windows (all versions).
3. Format partitions found on your drives
If you have just created a partition on one of your drives, the partition wizard has already offered you the option to format it. However, you can also format a partition that is already created and present on a drive. If this is what you want, you should keep in mind that formatting a partition means that all the data on it is removed, so make sure you backup any critical files on it before you go ahead.
To format an existing partition, right-click or tap and hold on it, in the Disk Management window, and then click or tap on Format. Set the label, file system type, and allocation unit size. Note that for the latter keeping the default unit size should be the right choice for most users.
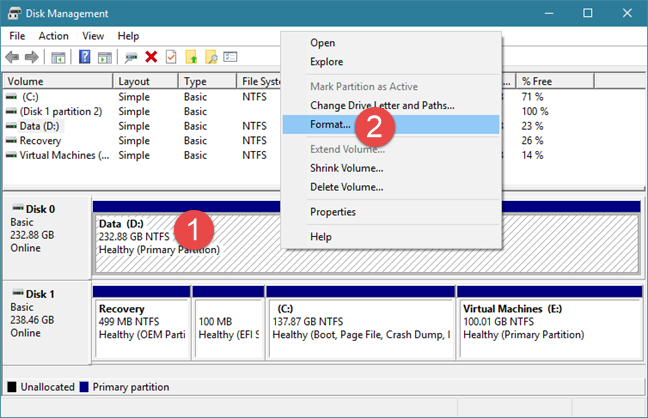
Then, Windows should start formatting the partition. This process should only take a few seconds, but that depends on the size of the partition and the speed of your drive. If you want more details on how to format drives, fixed or portable, you might be interested in this tutorial: 2 ways to format an SD Card, a USB memory stick or a hard drive partition, in Windows.
4. Resize the partitions found on your drives
You can also shrink or expand partitions on your drives, as long as there is some free (unpartitioned) space available immediately before or after the partition that you are trying to modify. Neither expanding nor shrinking a partition requires formatting.
To make a partition larger or smaller, right-click or tap and hold on that partition and click or tap on "Extend Volume" or on "Shrink Volume," depending on what you want. Then, follow the steps of the "Extend Volume Wizard" if you chose to make it bigger, or choose how small you want to make it in the "Shrink" dialog window.
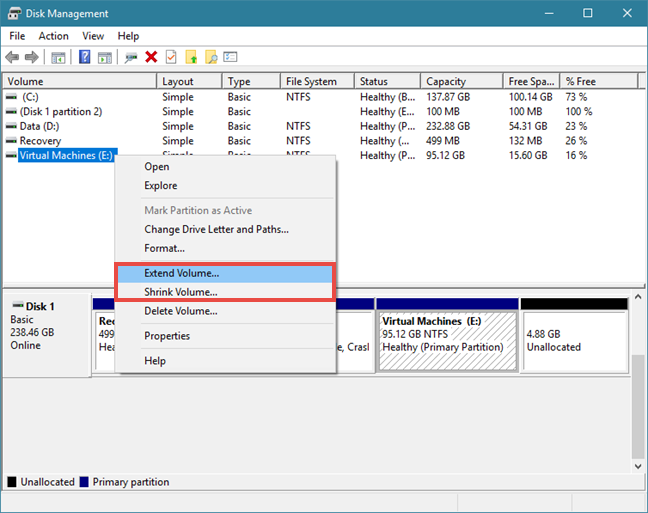
If you want a step-by-step guide on how to resize partitions in Windows, see this tutorial: 2 ways to resize a partition in Windows (all versions).
5. Delete partitions from your drives
If there are any partitions that you no longer need and you want to free the drive space that they occupy, you can delete them using the same Disk Management tool. Take note though, that before you delete a partition, you should always make sure that there are no important files on it, as everything on it is going away too.
To delete a partition with Disk Management, right-click or tap and hold on it, and then click or tap on "Delete Volume." In the "Delete simple volume" prompt that is shown, confirm that you really want to do this and then the partition is erased.
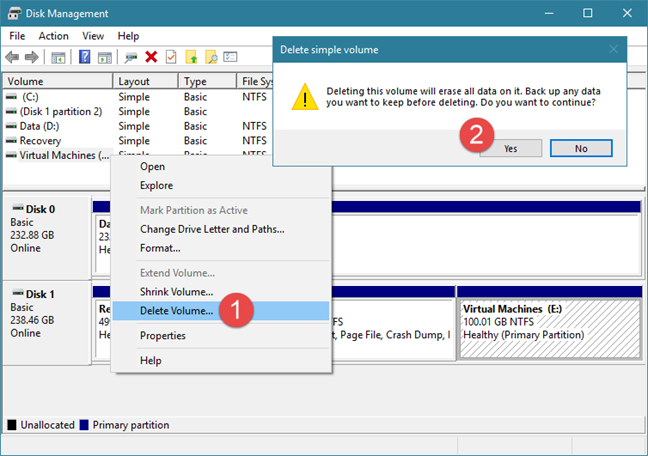
If you want more details about the partition deletion process, we have a separate step-by-step guide: Two ways of deleting a partition, in Windows, without third-party apps.
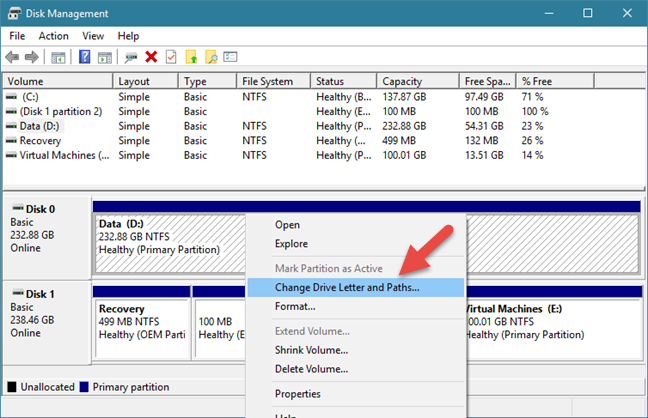
6. Change the drive letters of your partitions
Disk Management also offers you the option to change the drive letters. They are those letters that everyone sees displayed on their drives in File Explorer or Windows Explorer. The most common drive letter in Windows is "C" because it is the default letter used by the operating system to mark the Windows installation drive. That is also the reason why you cannot change the drive letter for the C drive, at least not using conventional methods. 🙂
To change the drive letter associated with a partition, right-click or tap and hold on that partition and click or tap "Change Drive Letter and Paths."
A new window should pop up, listing the drive letter of the partition. Click or tap Change and, in the next window, select the new drive letter you wish to assign to it. Then, click or tap OK.
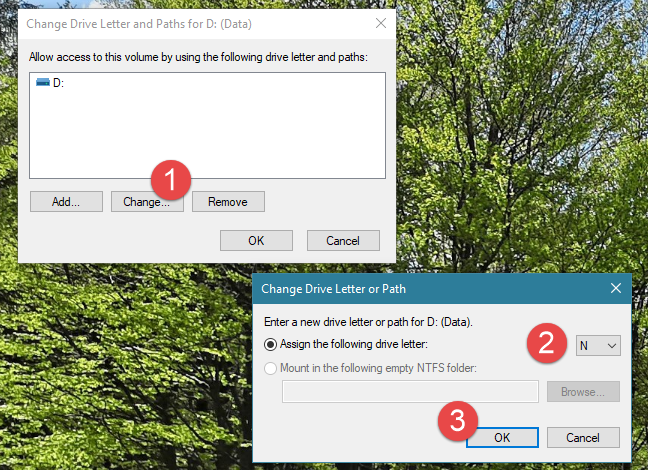
For a more detailed explanation of the whole process, you can read this separate guide that we have published: How to change the letter of any drive or partition, in Windows.
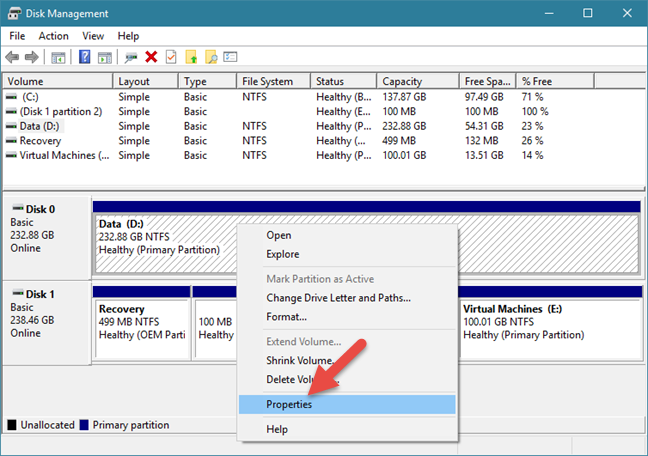
7. Change the drive labels of your partitions
Similarly to changing drive letters, you can use the Disk Management tool to change their labels too. The volume label of a partition shows up next to the drive letter when viewing the partitions in File Explorer or Windows Explorer, and it is also required if you plan on sharing the partitions with other operating systems. To change the label of a partition, right-click or tap and hold on the partition and select Properties in the contextual menu.
In the General tab of the partition's Properties window, type in the new label name next to the disk icon.

Click or tap on OK, and the partition's label will be changed immediately. In case you want to learn more ways to set labels for your partitions, check this guide too: 4 ways to label and rename any drive in Windows.
Do you use the Disk Management tool?
Or do you prefer other software from third-parties like MiniTool Partition Wizard Free, EaseUS Partition Master Free Edition, Paragon Partition Manager Free, or AOMEI Partition Assistant SE? We found the Disk Management utility to be easy to use for managing partitions, but some might feel otherwise. Do you have any tips on partitioning or do you want to make some recommendations with some good partition setups? If you do, or if you have questions, feel free to leave a comment below.