Drive mapping is the procedure through which you can associate a local drive letter (A to Z, as the ones used by your partitions) with an area on another network computer (like a shared folder) or internet location (e.g. FTP site). Using drive mappings can be very useful, especially when working with different operating systems on the same network. For example, if you use both Windows 7 and Windows XP in your home network, you cannot take full advantage of the HomeGroup feature. Using drive mappings can be a pretty good alternative.
Therefore, in this tutorial, I will show how to map a network drive towards a shared folder over your network and also to an internet location such as an FTP site.
How to Start the Map Network Drive Wizard in Windows 7
There are several ways to start the 'Map network drive' wizard. One way is to double click on the Computer shortcut and click on the 'Map network drive' button from the upper toolbar. Keep in mind that, if you browse through any partition, the button will disappear. It will only be available in the default Computer window.
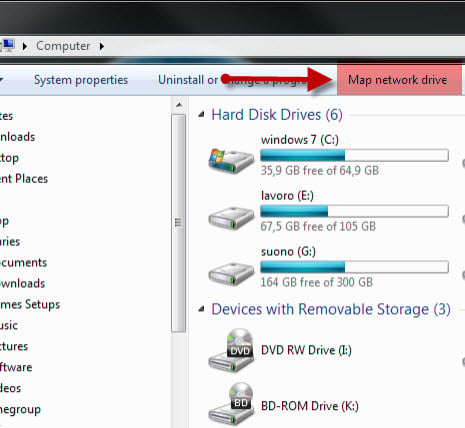
Another alternative is to right click on the Computer icon and select 'Map network drive'. The 'Map network drive' wizard will now start.
How to Map a Shared Network Folder in Windows 7
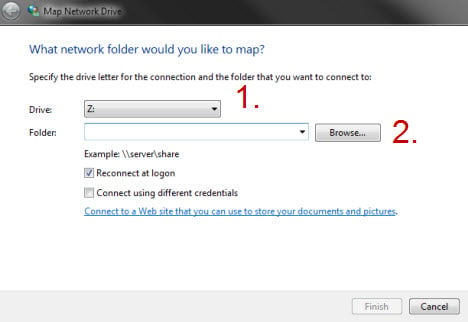
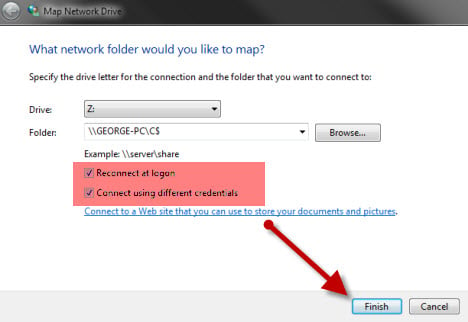
First, select the drive letter you want to use for this mapping. Then, click on Browse and select the network location you want to map.
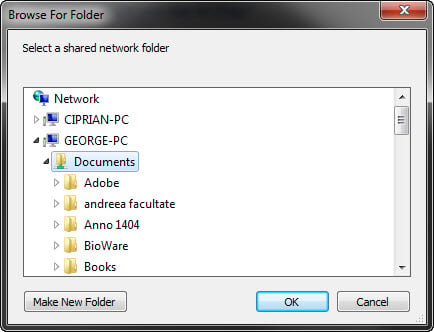
In the Browse window, select the computer & the shared folder you want to map to. When done, click on OK.
Instead of using the Browse button you can also directly type the location of the shared folder you want to map. Also, you can navigate to that location in Windows Explorer and then right click on it and select 'Map network drive'.
If you want Windows 7 to reconnect to this drive at each logon, make sure you check the box that says 'Reconnect at logon'. Also, if you map a drive to a computer using Windows Vista or Windows XP, you might also need to connect using a user account defined on that computer. In this case, check the box that says 'Connect using different credentials'.
When done, click on Finish.
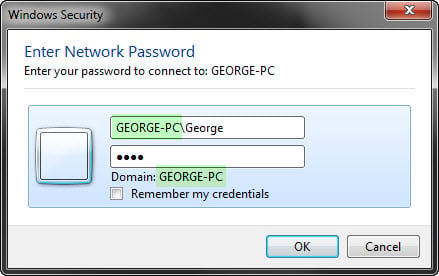
In some scenarios, as the one mentioned above, you will be asked to enter a username and password to connect to the network location.
Here there is a very important catch: when you type the username and password, Windows 7 will use your computer as the 'domain'. This can cause problems when trying to access the network location because you will try to connect to another computer using a user defined on your computer. And, most probably it won't work. As you can see from the screenshot below, you need to make sure that the domain field has the name of the computer you are trying to connect to.

To do this, in the user name field type the name of the PC you are connecting to, a backslash ('' key) and then the user you want to use for the connection. That user must be defined on the computer you are connecting to. Otherwise it won't work.
If you typed things correctly, you will see that the domain field has changed value to the computer you are trying to connect to. When done, click on OK.
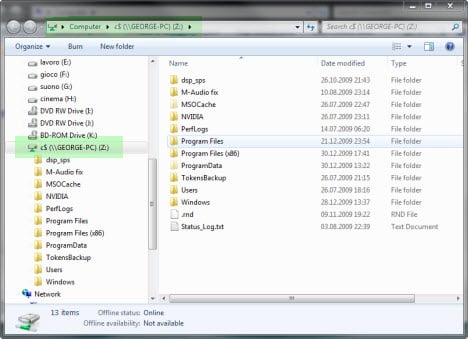
If the mapping process worked fine, the newly created drive will open and will become available in the Computer window and in Windows Explorer.
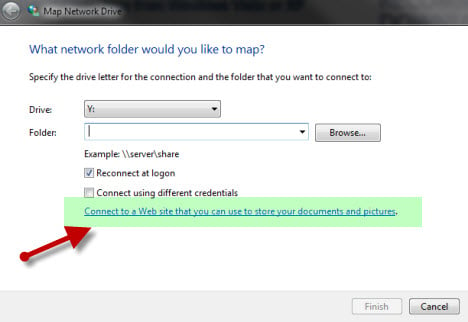
How to Map an FTP Site in Windows 7
To map a drive to an FTP site, click on the link that says 'Connect to a Web site that you can use to store your documents and pictures'.
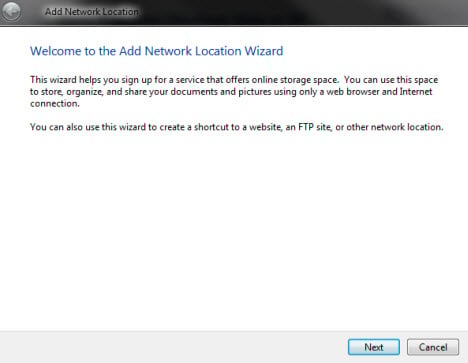
A new 'Add Network Location' wizard will start. Click on Next.
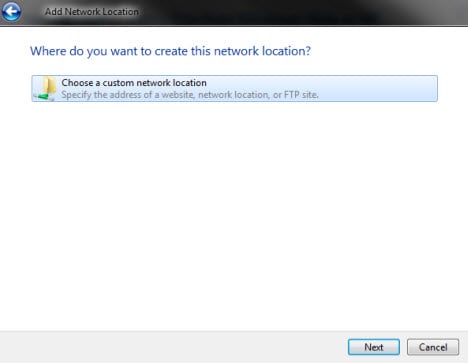
In the next window, click on 'Choose a custom network location'.
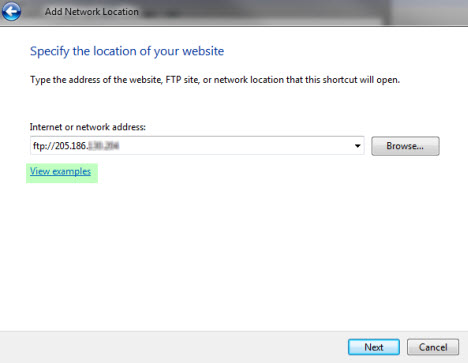
Now it is time to type the location of the FTP site. First type 'ftp://' and then the IP address or name of the FTP site. If you want to see more examples of how to type the address, click on the View examples link. When done, click on Next.
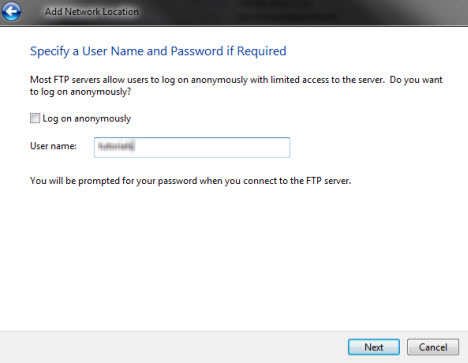
You will then specify a user name for connecting to the FTP site. If your FTP site allows anonymous connections, leave the 'Log on anonymously' check box ticked. Otherwise, uncheck it.
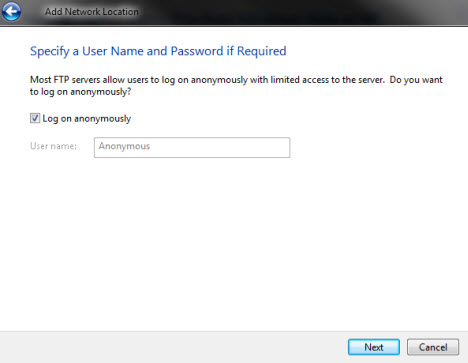
If you unchecked it, type the username in the appropriate field and click on Next.
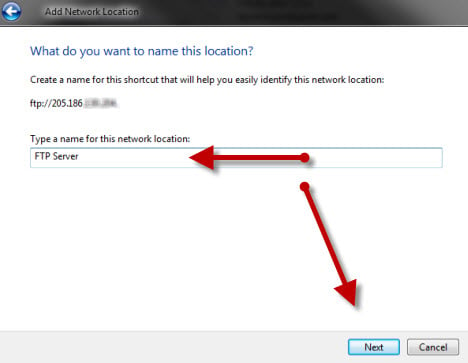
Windows 7 now asks you to provide a name for this mapping. Type any name you want and click on Next.
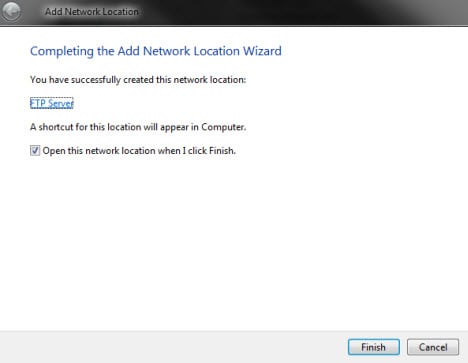
To test the newly created mapping, check the box that says 'Open this network location when I click Finish' and then click on Finish.
In case you need a username and password to connect to the FTP site a new window will open, asking you to type both these details. Type them and check the box that says 'Save password', in case you don't want to enter it every time, and click on 'Log On'.
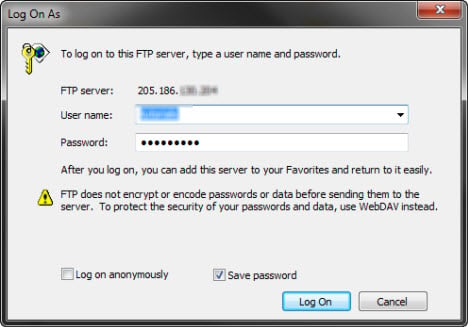
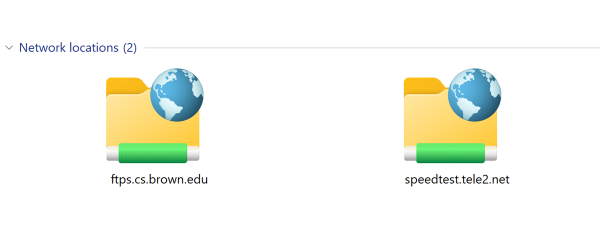
The FTP site will now be available directly from the Computer window as a mapped drive.
How to Delete a Mapped Drive in Windows 7
In case you need to delete a previously created drive mapping, check out this tutorial for complete instructions: How to Delete Mapped Drives in Windows 7. It shows all the alternatives you have for deleting them both from Windows Explorer and the Command Prompts.
Conclusion
Making drive mappings in Windows 7 is a not as straightforward as it should be. You can encounter issues if you are not very careful, so do pay attention to all the instructions in this tutorial. Also, do take a look on the articles we recommend below. They might help you in case you have some issues.
If you have some tips to share or you encounter issues you need help with, don't hesitate to leave a comment.