In previous tutorials we have covered how to share files between Ubuntu and Windows 7 computers on your home network. This tutorial will complement previous ones and show how to make Ubuntu auto-mount a partition or folder from Windows 7 so that you can always have access to it from the second you log in to Ubuntu. The procedure has some complexity but once you do it the first time, it will be easier to do it a second or third time.
NOTE: This tutorial updated to work on Ubuntu v10.10 & 11.04.
Step 1: Configure the Computers on the Same Workgroup
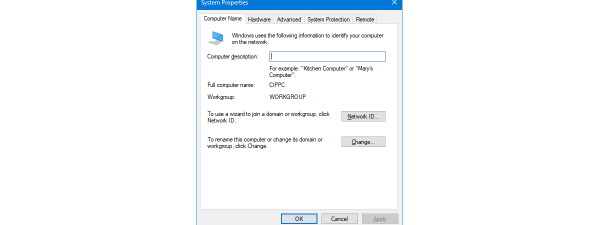
In order for Ubuntu and Windows 7 to easily share files, they have to be configured so that they are on the same Workgroup.
To change your Windows 7 workgroup, see: How to Change the Workgroup in Windows 7.
To change your Ubuntu workgroup, see: How to Enable File Sharing & Change the Workgroup in Ubuntu Linux.
Once the Workgroup is set up to be the same on both computers, proceed to the next section of this tutorial.
Step 2: Configure Shared Folders and Sharing Options on Your Windows PC
If you have not already set up a shared folder on your Windows PC, you'll need to do so now. This involves two sub-steps for which we've written individual tutorials:
- 1) Modify network sharing settings to enable network discovery and file sharing;
- 2) Configure your shared folders (See Also: Share Libraries or Folders Using Advanced Sharing).
Step 3: Setup Ubuntu to auto-mount a folder or partition from a Windows 7 PC
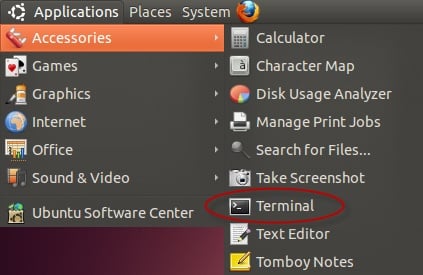
First, you have to open a Terminal window. From the top menu bar, click on Applications and then on Terminal.
In the Terminal window write the following sudo mkdir /media/mountname and press Enter. Substitute mountname with the name of the folder or partition that you want to mount. In the example below, I mounted my Windows 7 Music folder, so I typed: sudo mkdir /media/music.
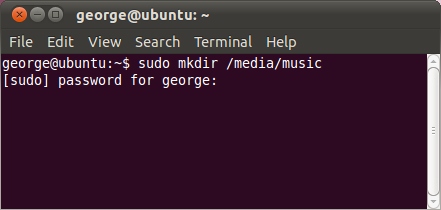
Next you will be asked for your password, type it in and press Enter. Then, write in the Terminal window the following: sudo gedit /etc/fstab and press Enter.
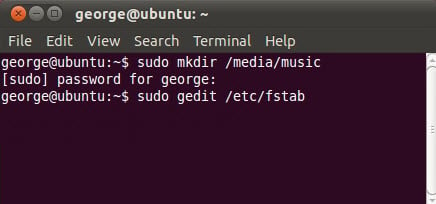
The fstab file (file system table) will open in a gedit window. Gedit is the equivalent of Notepad in Ubuntu. At the end of the fstab file, you have to write this line: //servername/sharename /media/mountname cifs username=myusername,password=mypassword 0 0.
Replace the following:
- servername with the name of the Windows 7 PC that is sharing the folder or partition. In our example this is george-pc.
- sharename is the original name of the folder or partition in Windows 7. In our case that is music.
- mountname will be the name of folder that you wrote in the Terminal window earlier.
- myusername is the name of the Windows 7 user account and mypassword is the password that corresponds to the user account defined in Windows 7. In our case the user account is george and the password is pass.
The whole line of code will look like this in our example: //george-pc/music /media/music cifs username=george,password=pass 0 0.
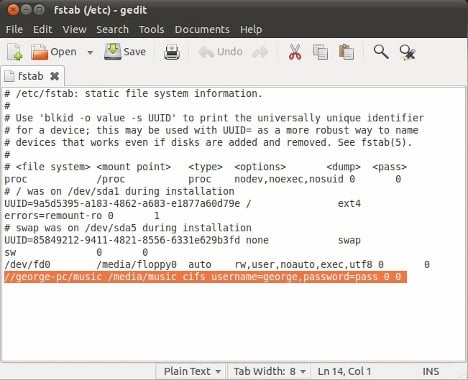
Note: Be careful not to leave any spaces between the username, the comma and the password. If you do, the auto-mount of the folder or partition will not work.
Close the gedit window once you have finished.
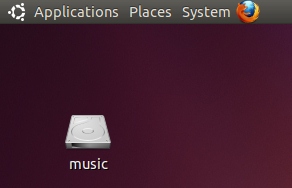
In the Terminal window now type sudo mount -a and press Enter. This will make the mounted folder of partition appear on your Ubuntu Desktop.
Note: In order for Ubuntu to auto-mount a folder or partition from a Windows 7 PC, that PC needs to be opened and connected to the same network as the Ubuntu system.
How to Remove a Mounted Folder or Partition from Ubuntu
To remove a mounted folder or partition you have to open the Terminal, then open gedit using this command: sudo gedit /etc/fstab. In the gedit window remove the line you previously added (//servername/sharename /media/mountname cifs username=myusername,password=mypassword 0 0). By default, it should be the last one.
Now close gedit and the Terminal. Next time you open Ubuntu the folder or partition will no longer be mounted.
Conclusion
On a network with Windows 7 and Ubuntu computers, you can configure Ubuntu to share files and folders which are easily accessible from a Windows PC. If you want to know more about setting up other PCs on a local network, or how to further utilize the networking features between Ubuntu Linux and Windows 7, check out the articles listed below.