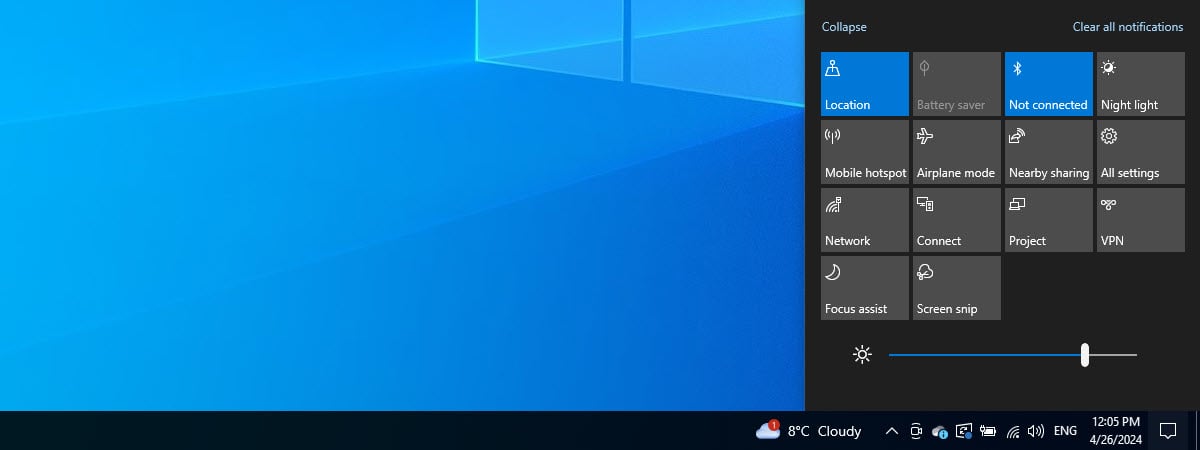
Skip to Content

Tutorials

Windows 7 Tutorials

How to Manage Existing Tasks in Task Scheduler

After two articles on how to create a task, for both beginners and advanced users, I continue our series on Task Scheduler with a tutorial about the commands which can be executed on an already created task. More precisely, I will show how to run a task on demand, how to end, disable, import, export and delete an existing task. I will share details on what are the effects of each of these commands, together with usage examples so you can make the best of this powerful tool - Task Scheduler.

Connecting to A Windows Remote Desktop from Ubuntu

A useful feature of Windows is being able to connect to your desktop from another location to remotely manage your computer. While this functionality is native in Windows 7 and previous versions, it is not supported by default in many Linux distributions. However, using a simple tool called Gnome-RDP, I will show you how to connect to a Windows 7 remote desktop from an Ubuntu Linux desktop.

Play Any Video Format in Windows Media Player 12

In terms of file compatibility, Windows Media Player 12 is by far the most ecumenical to date. Where Microsoft once tacitly shunned third-party file types - such as Apple’s Quicktime (.MOV) and DivX - it now supports an impressive number of file types out of the box. Still, avid media enthusiasts will occasionally come across a video file type that Windows Media Player 12 can’t handle natively. Luckily, all you’ll need to for the small fraction of video formats that Microsoft chose not to support from the get go, is a handy codec pack. This tutorial will show you how to install the K-Lite Mega Codec Pack, which enables support for virtually every video file type under the sun.

Create an USB Memory Stick with System Recovery Tools

In one of our previous articles, we've shown How to Create a System Repair Disc on a CD/DVD with just with a few clicks. In will continue the discussion by showing how to create a bootable flash memory stick with System Recovery Tools on it.

Add or Remove the Take Ownership Option to the Right Click Context Menu

Taking ownership files or folders in Windows in general, is a process that takes time and a bit of attention. Fortunately for us, there are solutions which allow you to add or remove the Take Ownership shortcut to the right click context menu. In this article I will cover two of these solutions.

Wake the Computer to Run a Microsoft Security Essentials Scan

In a recent review of Microsoft Security Essentials it was discovered that an option to wake the computer to perform a scheduled scan did not exist. There is a way to force the computer to wake up and complete a scan but it involves editing the scheduled task within Windows 7. This tutorial will take you through the steps required to get this done.

Take Ownership and Change Permissions of Files and Folders

Switching to another operating system or importing data can lead to the impossibility of accessing your files and folders. This is result of the fact that your user has lost ownership of those files & folders or it no longer has the required permissions. Also accessing certain system protected files or folders involves sometimes modifying the file permissions for those resources. When you cannot read or change files/folders from your disk, it means that either you need to take ownership of them or you need to change your user's permissions. In this article you will learn how to change ownership of a file or folder and how to manage permissions for accessing and modifying them.

NOTE: You must be logged in as Administrator to take ownership or to change your user's permission rights.

Syndicate content